Property and Event Binding in Angular 2+
Property and Event Binding in Angular 2+ is a very powerful tool offered by the Framework. You can easily pass values to child elements (Input) and emit changes (event binding) to the parent element (Output). The third option would be to use both as so-called two-way binding.
All of the following examples and descriptions can be found in this GitHub Repository -> Angular Property Binding. Just clone it, install all the packages and run it to see live how it works.
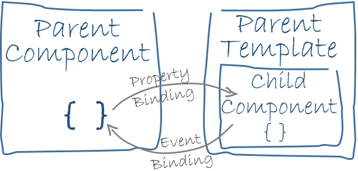
As the first step, we create a child component which receives data from the parent component as Input and emits values as Output back to the parent component. Via the @Input and @Output decorators, we tell angular that we provide an Input declaration in our component template which is defined by square brackets and an Output declaration which is defined by parenthesis.
Keep in mind that every @Output has to be an EventEmitter with a type definition. If you want to update the output, you have to call the emit function. This eventually calls the event binding within the parent component.
Child Component
To display the value passed from the parent component as Input we can use the double curly-brackets {{property-name}} to bind a property to the component's template.
Parent Component
To use the child component and glue it together with the parent component you have to add the child component in the parent component template.
<app-child [parentInput]="textInput" (childOutput)="updatedChildValue($event)">
</app-child>
Since the Output from the child component is actually an event you have to register the event to a function. In this function, you will get the actual data as a parameter.
Two-Way Binding
There is also the possibility to combine Input and Output binding in one declaration. The child automatically updates the "parent-tow-way" property in the parent.
<app-child [(parent-tow-way)]="value"></app-child>
In Addition to that, when a value changes the OnChanges lifecycle hook is triggered and you will receive a SimpleChanges object with the old and new value/data.
That's all you have to do - you know have successfully made a parent-child "relationship" via Input and Output decorators.