Using a Content Delivery Network (CDN) with Ghost CMS
When using a Content Management System (CMS) like Ghost CMS, or WordPress, you want to speed up your page load. The reason is simple, a faster loading page means a better search engine ranking and a better user experience. Surely, every CMS can serve your images and media files fine, but a real content delivery network can decrease the loading times tremendously. Google, and any other search engines, will appreciate it when you use a CDN. You may show up higher in the search results which eventually boost your traffic stats.
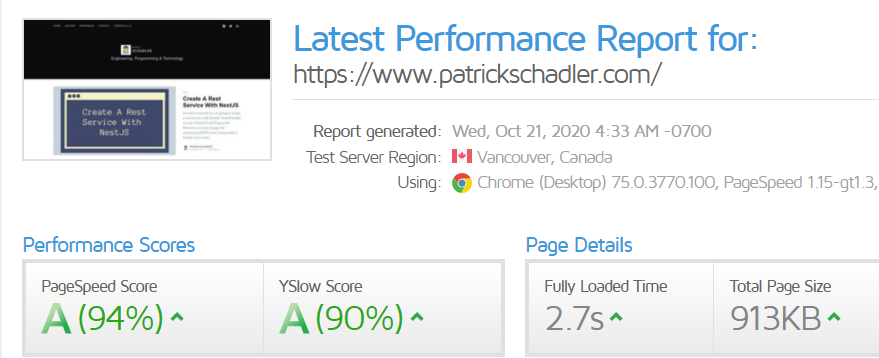
Another very popular page speed tool is GTmetrix. It does a couple of different checks which results in slightly different results.
Choosing a CDN for Ghost CMS
For this blog, I am using Cloudinary. They offer a pretty decent free tier, which is totally enough for a small blog like mine. However, different blogs and website have different needs, so feel free to search for any alternative on the market. You may have a look at the out of the box supported solutions for Ghost at their documentation as well.
What about Ghost Pro?
Ghost Pro supports Cloudflare CDN out of the box and you can't change the CDN!
Set Up A CDN For Ghost CMS
Luckily, Cloudinary has an official documentation for integrating with Ghost CMS. Basically, you have to change the logic in your design template.
Download your current template and open the /partials/post-card.hbs file in an editor of your choice.
Somewhere at the beginning you should see something like this.
{{#if feature_image}}
  <a class="post-card-image-link" href="{{url}}">
    <div class="post-card-image" style="background-image: url({{feature_image}})"></div>
  </a>
{{/if}}
Basically, Cloudinary has nothing to do with your Ghost CMS installation. You just pass the original image path, which is available via the img_url and feature_image variable {{img_url feature_image}} to their endpoint. To get this working make sure you have the absolute attribute set to true.
Your final code should look like this. Replace the YOURUSERNAME part with your Cloudinary username/token.
{{#if feature_image}}
  <a class="post-card-image-link" href="{{url}}">
    <div class="post-card-image" style="background-image: url(https://res.cloudinary.com/YOURUSERNAME/image/fetch/w_600,h_400,c_fit/{{img_url feature_image absolute="true"}})"></div>
  </a>
{{/if}}
Limitations
The one and only real limitation is, that the post-card images are served as CSS background image. Through that, Cloudinary can't properly resize your images. They only use the given parameters (e.g. w_600,h_400,c_fit) to deliver the image. You can look up at their support page for more information on that. Keep in mind when using an image tag, Cloudinary will adjust the image size accordingly.
Custom Cloud Storage Adapter
You can use Cloudinary as a fully custom cloud storage adapter. This means, that every image is directly uploaded and processed at Cloudinary, rather than via the Ghost CMS like in the above example. I haven't used this adapter yet, but check out the fully tested open-source adapter here.